...
Getting Started in the TMS - Front page
The TMS front page provides you with quick access to the most common actions you can take.
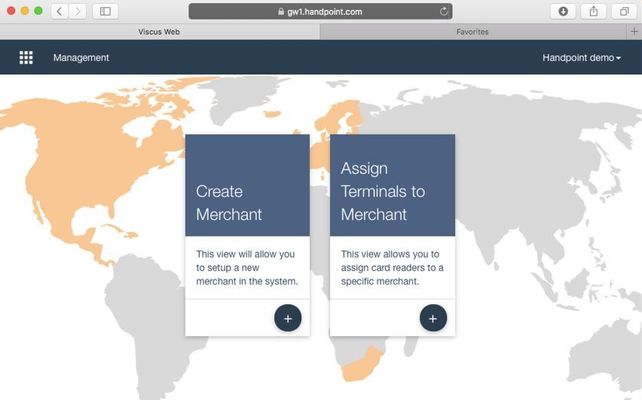
From here you can create merchants and assign terminals, or go directly to your management view of your merchants and terminals.
Clicking the dropdown menu on the right lets you update your user profile.
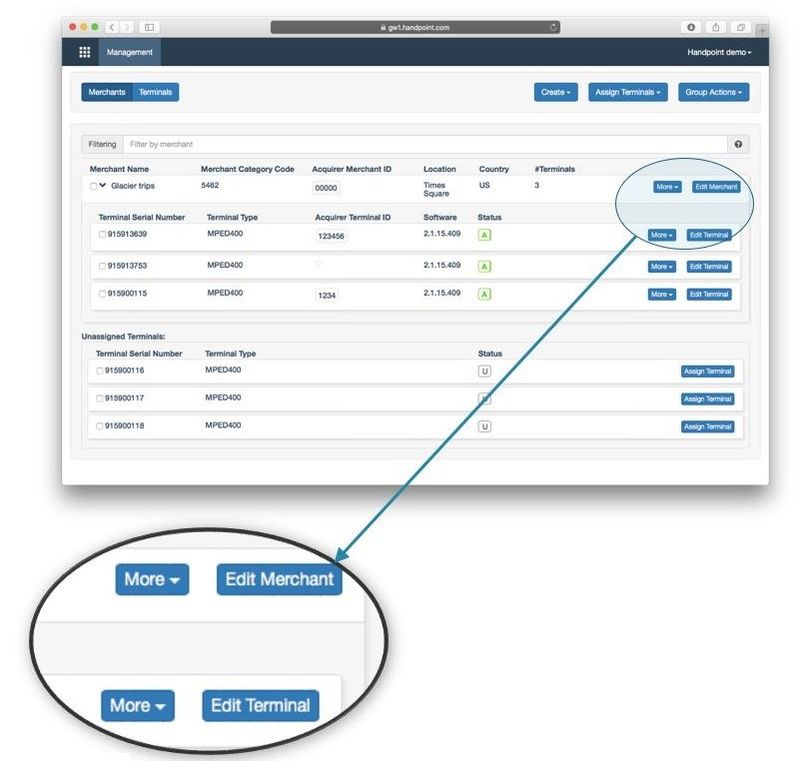
Management page
The management page provides you with a detailed view of your onboarded merchants terminals.
Creating a Merchant
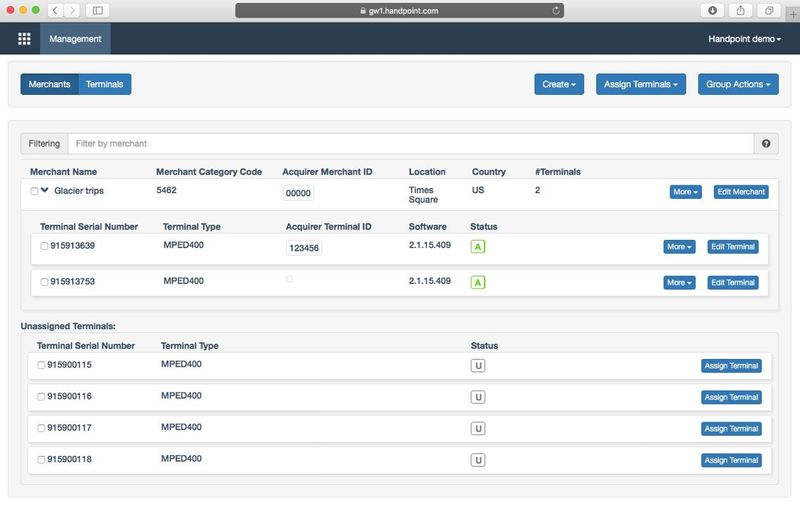
As on the front page, you can create merchants and assign terminals, as well as have access to all other actions from this single page.
Data can be organized in a hierarchical view from a merchant perspective or a flat view as a list of terminals.
Data can be filtered by merchant or terminal information for a quick lookup when needed.
Management Page Navigation
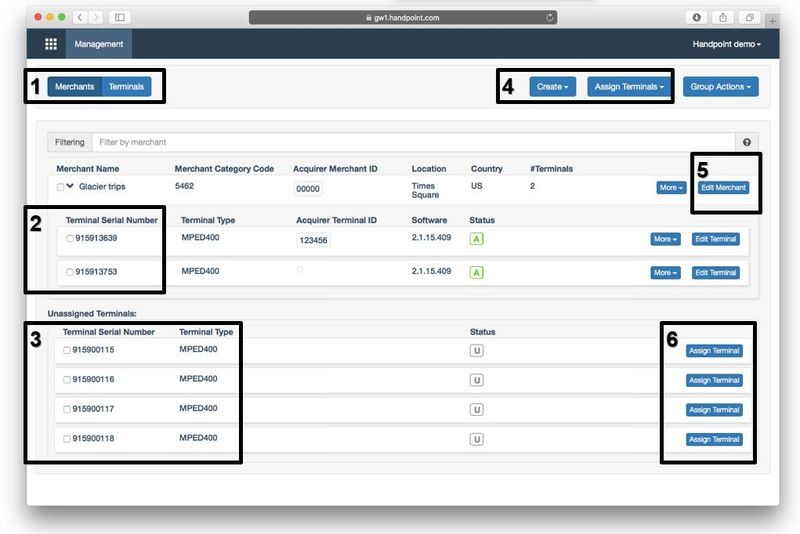
- Information can be grouped by merchants or viewed as a list of terminals
- This is the hierarchical view of terminals assigned to merchants
- A list of your unassigned temrinals can be found here. These are terminals that you may have purchased but have not yet been assigned to a specific merchant. Contact Handpoint to have new terminals added to this list.
- Here you can create new merchants and assign multiple terminals
- Merchant information can be updated here if needed, and below this, terminal information can be updated.
- A single terminal can be assigned to a merchant from here.
Searching and Filtering
The TMS comes with a filtering tool to help you quickly find what you need. It updates the list view below dynamically based on what you input. The dataset it searches through is linked to the selected view (Merchants or Terminals) and is filtered based on all fields for that particular type of entity
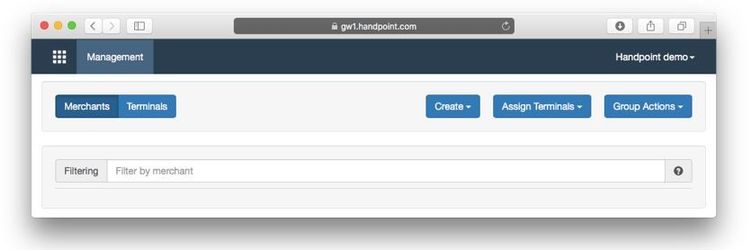
To search for a specific terminal, first ensure you are filtering by terminals. Then simply enter a part of the terminal's serial number into the filtering field – the last 4 digits should suffice.The list updates automatically when it finds data which matches the criteria.
If you want to filter by a merchants name, location, ID, category code, etc. Simply enter what you are looking for in the filter box and the results will be updated automatically.
Creating Merchants in the System
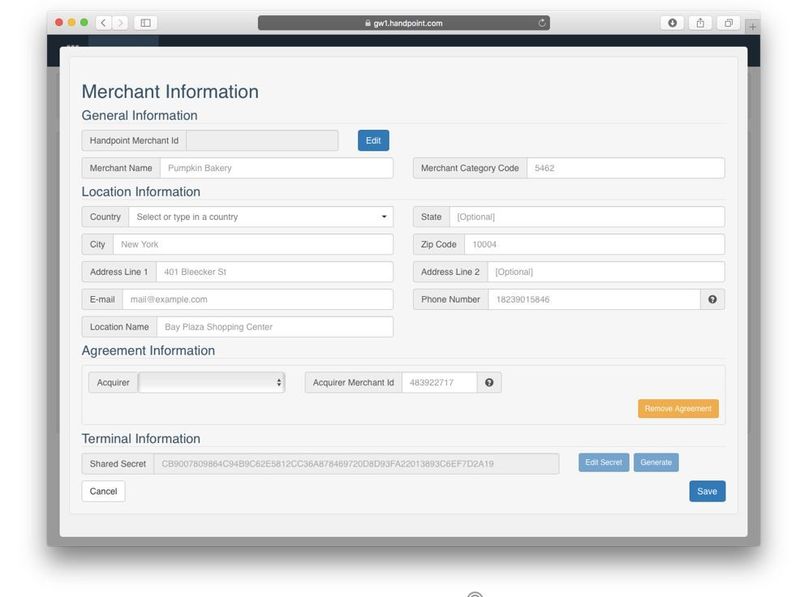
Creating a merchant is the first step in onboarding merchants to the Handpoint platform.
Here you fill in the relevant information from the processor VAR sheet.
Select the relevant acquirer.
The Shared Secret can be found at the bottom of the page.
You will continue entering the rest of the VAR sheet information when assigning terminals.
The Handpoint Merchant ID is generated by the system based on what is input in the Merchant Name field.
After information has been input, press Save. You can stop and restart this process. Once the Merchant Information is complete, you will be given the option to immediately Publish the information and activate the merchant.
Which fields are required?
Typically all fields are required, the system will let you know if it’s missing some required fields.
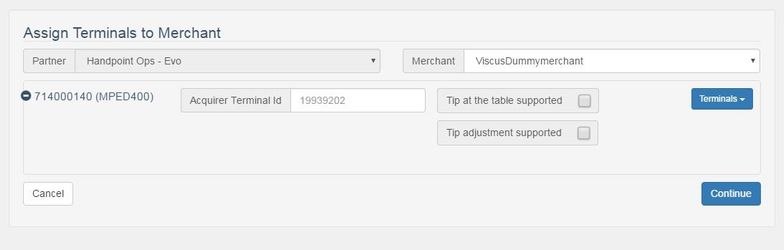
Assigning terminals to merchants
Terminals can be assigned from 3 different places in the TMS: from the front page, the top of the management page, or next to an unassigned terminal. They all lead to the same process.
This will bring up a view where you are able to select a merchant and assign one or more terminals to it. Terminals are identified by the Serial Number found on the back of the terminal.
After assigning a terminal to a merchant, the next step is to Edit that terminal and finish the setup from the VAR sheet.
To Edit a terminal, locate the terminal in the management view and click Edit terminal.
Can I start creating a merchant without assigning terminals?
Yes. It is very possible to first create the merchant and then add the terminal later on when the serial number for that terminal is known.
Where do I locate the Serial Number?
The terminal serial number can be found on the back of the Card Reader and its packaging. It is a unique identifier for the terminal.
Editing a terminal
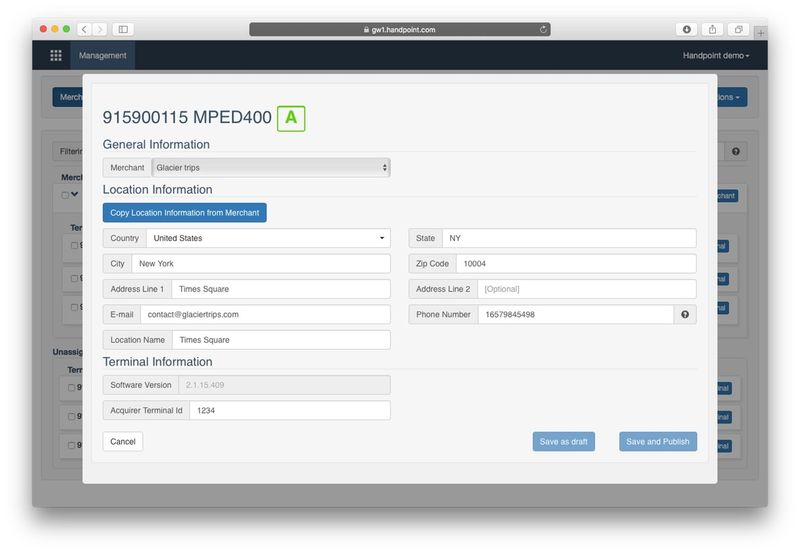
Editing a terminal is the final stage in finalizing the onboarding
You can copy duplicate information from the merchant setup to speed up process.
Fields in the terminal information section might differ depending on which processor the merchant is setup for
When do changes go live?
Changes are live as soon as they are published. However, changes that propogate to the card reader do not go live until the card reader connects to the gateway, i.e., through a transaction or an update. Then the terminal will automatically download and update itself. This generally takes less than a minute to complete.
Save and publish when done.
Locating the Shared Secret
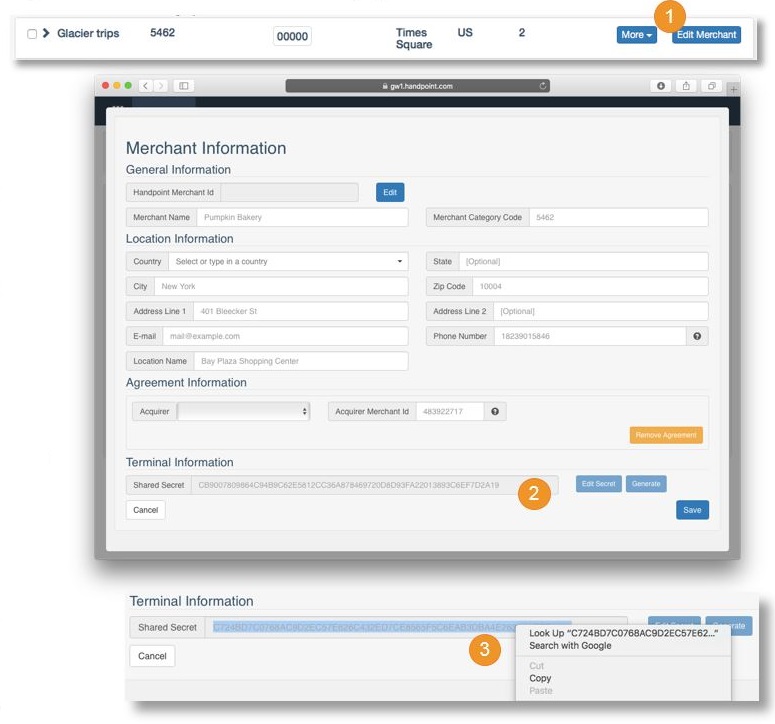
The shared secret is the key to merchants’ terminals – It needs to be delivered to the organization responsible for storing the key on the behalf of the merchant. Typically it is the ISV’s responsibility.
The shared secret is a randomly generated string of text and is the same for all terminals in a single merchant account. It is generated randomly but can be edited by Handpoint admins only.
- To locate the shared secret click Edit Merchant next to the merchant listing in the management page. This will bring up the Merchant Information view.
- Locate the Shared Secret field.
- Double click on the text to highlight the shared secret, right click, and choose Copy.
You should now be able to paste it into the tool of your choice for sending
Tipping Configuration
Handpoint supports tipping on the card reader. If enabled, the card holder is prompted to tip on the card reader during a sale. The card holder can choose between preset values, a custom value, or “No Tip” before commencing with the transaction.
Tipping is enabled per terminal and custom values can be configured both on a merchant level and terminal level.
On the merchant level you can configure custom tip values – This is done in the Edit Merchant or Create Merchant views

Tipping has to be enabled per terminal and custom values can be configured further there if needed. This is done in the Edit Terminal view.

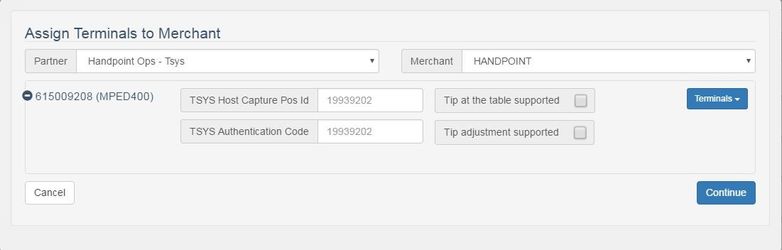
Tip Adjustment (
VantivEVO and Tsys)
Handpoint card readers support tipping at the point of sale where the tip amount is added directly on the card reader as an extra step during the sale transaction.
To enable this, you must choose the option while assigning terminals to the merchant.
TSYS
Deleting and unassigning
Merchants can be deleted and terminals can be unassigned.
Obviously, deleting a merchant is a high risk operation and should only be done if there was an error during the onboarding and it is considered quicker to just delete and start over.
Terminals can be unassigned from merchants. This is done if, e.g., a merchant returns the device to you for replacement or to upgrade to an alternative Handpoint device, such as the HiPro. Merchants with no assigned terminals are considered inactive.
When terminals are unassigned from a merchant they are moved to the list of unassigned terminals.
Both deleting and unassigning is done from the More dropdown button next to an item in the management view.
Reusing Terminals
Terminals can be reused and moved from merchant to merchant. In order to do so, the following best practices help ensure a smooth merchant experience and minimze the risk of additional customer support.
- Unassign terminal from old merchant
- Assign alternative terminal to new merchant
- Update terminal information
- Extract and send the shared secret
- Do a flash reset on the card reader with simple instructions provided to the merchant
- Initiate an update to the card reader
Point 5 and 6 can be done by the merchant, and require minimal effort.
You can find the Powerpoint version of this guide here:
...